


Pet Clinic Construction

Top: May 24, 2011 Ultrasonic cleaning under anesthesia protocol without intubation.

Top: May 24, 2011 Vital signs monitor located at every workstation. You can hear the beep-beep in the background!

Top: May 24, 2011 A greyhound awaiting surgery in one of our post-op cages.

Top: May 24, 2011 Thanks to our Fuji Digital Processor, we can rperform and read x-rays in the light of day! The processor can manipulate the picture, making it lighter or darker and has zoom capabilities.

Top: May 24, 2011 Aligning a greyhound on the table for an x-ray. Most often this can be done without anesthesia.

Top: May 24, 2011 Alignment on x-ray table.

Top: May 24, 2011 Bandage cart.

Top: May 24, 2011 Performing an ultrasonic touch-up on a greyhound. This service is not available for greyhounds at most clinics.

Top: May 24, 2011 Clinic waiting room.

Top: May 24, 2011 Our intravenous supply cart which we have two. These carts can be wheeled anywhere they are needed.

Top: May 24, 2011 Chemistry Diagnostic Machine and T4 Analyzer.

Top: May 24, 2011 CBC Diagnostic Machine for blood analysis.

Top: May 24, 2011 Ultrasonic cleaning.

Top: May 24, 2011 Four post-op cages located in our surgical area, two of which are padded.

Top: May 24, 2011 Two dental work stations. All 7 of our work stations include anesthesia machine, vital signs monitoring machines, dentistry machines, and dental bonding supply kits.

Top: May 24, 2011 Dr. Patel performing a spay while a technician is cleaning teeth.

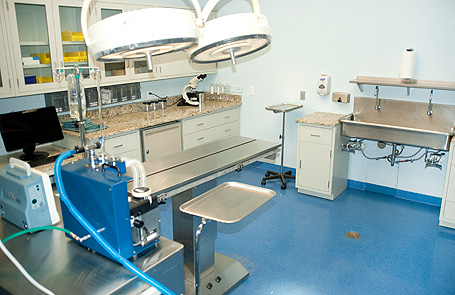
Top: May 24, 2011 A look through the door of our General Surgery area. This area is equipped with two surgical tables although the picture only shows one.

Top: March, 21 2011 Surgical Equipment

Top: March, 21 2011 Surgical Equipment

Top: March, 21 2011 Surgical Equipment

Top: March, 21 2011 Surgical Equipment

Top: January, 7 2011 General surgery

Top: January, 6 2011 General surgery

Top: January, 6 2011 General surgery

Top: January, 6 2011 General surgery

Top: January, 6 2011 Bloodwork machine installed

Top: January, 6 2011 Bloodwork machine installed

Top: January, 6 2011 Bloodwork machine installatoion

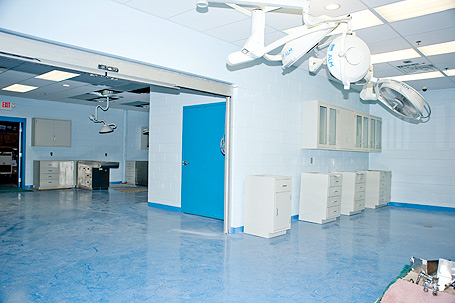
Top: January, 6 2011 Entrance to general surgery

Top: January, 6 2011 Intensive care unit

Top: January, 6 2011 General Surgical area

Top: January, 6 2011 Entance to the special surgery area

Top: January, 6 2011 New dental area

Top: January, 6 2011 New Examination Room

Top: January, 6 2011 New Examination Room
Top: January, 6 2011 Special surgical area

Top: January, 6 2011 Special surgical area

Top: January, 6 2011 Examination room

Top: January, 6 2011 Replacing the floors in the indoor turnout area.

Top: January, 6 2011 Replacing the floors in the indoor turnout area.

Top: January, 6 2011 Replacing the floors in the indoor turnout area.

Top: January, 6 2011 Replacing the floors in the indoor turnout area.

Top: January, 6 2011 Replacing the floors in the indoor turnout area.

Top: January, 5 2011 New updated X-ray room.

Top: January, 5 2011 Examination room.

Top: January, 5 2011 Our old surgical area.

Top: January, 4 2011

Top: January, 4 2011 New clinic waiting room

Top: January, 4 2011

Top: December, 15 2010

Top: December, 15 2010

Top: December, 15 2010

Top: December, 15 2010

Top: December, 15 2010

Top: December, 15 2010

Top: December, 15 2010

Top: December, 2 2010

Top: December, 2 2010 More surgical equipment keeps coming.

Top: December, 2 2010 More surgical equipment keeps coming.

Top: December, 2 2010 David Wolf is assembling the new surgical equipment.

Top: December, 2 2010 Cages in the surgical area are being installed.

Top: November, 29 2010 Granite Countertops are being installed.

Top: November, 29 2010 All merchandise is being moved to the new store.

Top: November, 23 2010 All merchandise is being moved to the new store.

Top: November, 18 2010

Top: November, 18 2010

Top: November, 18 2010

Top: November, 18 2010

Top: November, 18 2010

Top: November, 15 2010 New surgical facility is getting equipped.

Top: November, 15 2010 New surgical facility is getting equipped.

Top: November, 15 2010 Clinic construction goes on...

Top: November, 15 2010 Our GREYT store is moving to the new facility! It is going to be much nicer!

Top: November, 15 2010 New clinic reception room: desk is being installed

Top: November, 11 2010

Top: November, 11 2010

Top: November, 11 2010

Top: November, 8 2010

Top: November, 5 2010 Preparing the new store and the new waiting room for the Greyhound Sunday!!! Everybody is welcome!.

Top: November, 5 2010 Office doors are being installed.

Top: November, 5 2010 Office doors are being installed.

Top: November, 5 2010 Office doors are being installed.

Top: November, 5 2010 Office doors are being installed.

Top: November, 5 2010 Countertops and sinks are being installed.

Top: November, 5 2010 Eqipment starts arriving to the surgical facility.

Top: November, 3 2010 Installing and leveling the cabinets.

Top: November, 3 2010 Installing and leveling the cabinets.

Top: November, 3 2010 Installing a granite countertop.

Top: November, 3 2010 Installing a granite countertop.

Top: November, 3 2010 Installing a granite countertop.

Top: November, 3 2010 One of the new clinic offices.

Top: November, 3 2010 Installing a desk in one of the new clinic offices.

Top: November, 2 2010 The clinic comes out really nice...

Top: November, 2 2010 The new automatic doors have been installed.

Top: November, 2 2010 After a year of using our new kennel we have had all our floors professionally polished.

Top: November, 2 2010 After a year of using our new kennel we have had all our floors professionally polished.

Top: November, 1 2010 Ice maker has been installed.

Top: November, 1 2010 Connectors to supply air and power to surgical equipment.

Top: November, 1 2010 Our spectacular surgical facility is getting more stuff done every day!

Top: November, 1 2010 Door instalation in progress.

Top: November, 1 2010 A new fresh-painted door to the surgical facility.

Top: November, 1 2010 Another surgical table has been installed.

Top: November, 1 2010 Installing doors in the surgical area

Top: October, 29 2010

Top: October, 29 2010 Painiting - finishing touches

Top: October, 29 2010 Installing dental unit

Top: October, 29 2010 Installing dental unit

Top: October, 29 2010 Installing dental unit

Top: October, 29 2010 Doing plumbing

Top: October, 29 2010 Doing plumbing

Top: October, 29 2010 Doing plumbing

Top: October, 29 2010 Doing plumbing

Top: October, 28 2010 Installing a dental table

Top: October, 28 2010 Installing a dental table

Top: October, 28 2010 Installing a dental table

Top: October, 28 2010 Leveling the cabinets

Top: October, 28 2010 Caulking the cabinets

Top: October, 28 2010 Caulking the cabinets

Top: October, 26 2010

Top: October, 26 2010
Top: October, 26 2010

Top: October, 26 2010

Top: October, 26 2010

Top: October, 26 2010 Flooring is finished!

Top: October, 26 2010 Flooring is finished!

Top: October, 25 2010 Flooring almost done..

Top: October, 25 2010 More cabinets have been installed in our surgical facility!.

Top: October, 25 2010 One more room to put flooring into.

Top: October, 25 2010 More painting!

Top: October, 22 2010 Powerwashing and cleaning the kennel.

Top: October, 22 2010 Flooring in our store is almost done! Finishing details...

Top: October, 22 2010 Flooring Installation in our new NGAP store.

Top: October, 22 2010 Flooring Installation in our new NGAP store.

Top: October, 22 2010 Flooring Installation in our new NGAP store.

Top: October, 22 2010 Flooring Installation in our new NGAP store.

Top: October, 22 2010 Cabinet installation.

Top: October, 22 2010 Cabinet installation.

Top: October, 22 2010 Cabinet installation.

Top: October, 22 2010 Cabinet installation.

Top: October, 22 2010 Cabinet installation begins...

Top: October, 18 2010 The next step - furnishing. All cabinets have been delivered..

Top: October, 18 2010 The next step - furnishing. All cabinets have been delivered..

Top: October, 12 2010 The last step - the durable urethane coat has been applied.
Now all we will need is to mop and hose the floor to keep it as beautiful as it looks now.

Top: October, 11 2010 The last coat of clear epoxy is drying before the application of urethane.

Top: October, 11 2010 Another coat of epoxy goes on...

Top: October, 11 2010 Finally, the surface is sanded to make it nice and smooth because this is a surgical area and we do not want any texture which may hold contaminants.

Top: October, 08 2010

Top: October, 08 2010

Top: October, 08 2010
Top: October, 08 2010

Top: October, 08 2010 A clear epoxy coat, which sets overnight, is applied and then another final clear coat is applied which protects the floor from abrasive cleaners.

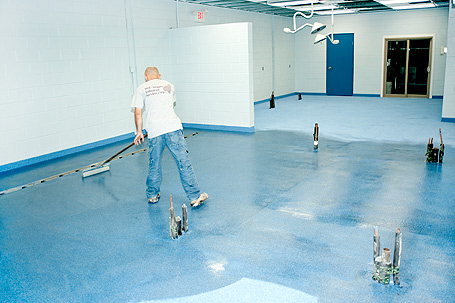
Top: October, 07 2010 Top coat spot application in hard to reach places.

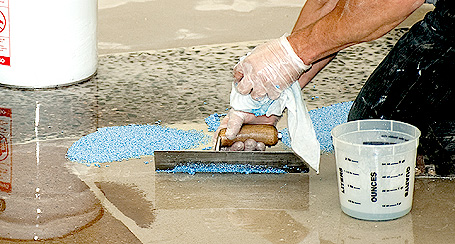
Top: October, 07 2010 After the material sets for one night, whatever granules do not stick are swept up and an additional adhesive coating is then applied. Once again, the floor is broadcast. That material is then swept up.

Top: October, 07 2010 Throwing out colored granules.

Top: October, 07 2010 Throwing out colored granules.

Top: October, 07 2010 Throwing out colored granules.

Top: October, 07 2010 Workmen wearing football type cleats so they do not disturb the adhesive while walking around and throwing out colored granules.

Top: October, 07 2010 A clear adhesive is rolled onto the floor.

Top: October, 07 2010 Clear adhesive application.

Top: October, 07 2010 A clear adhesive is rolled onto the floor.

Top: October, 07 2010 Cleaning up details and patching imperfections on the flooring surface.
Top: October, 07 2010 Cleaning up details and patching imperfections on the flooring surface.

Top: October, 07 2010 Cleaning up details and patching imperfections on the flooring surface.

Top: October, 07 2010 The cove base had to be installed along the sides of the wall before the floor can be put down.

Top: October, 07 2010 The cove base had to be installed along the sides of the wall before the floor can be put down.

Top: October, 07 2010 A moisture barrier, which came with a 10-year warranty, was first put down, showing a beautiful clear coat hard finish.

Top: October, 06 2010 The floor system started with a primer coat which was on the floor for two years. All of that material was ground off to get back down to base concrete once again because there was a concern about moisture coming through the concrete.

Top: October, 06 2010

Top: October, 05 2010 These photos of work above the ceiling may not look like much but are an integral part of every surgical unit. We will have seven drops coming from the ceiling which will bring down oxygen, distilled water, clean compressed air, exhaust from the anesthesia machine and electric. There will be on additional drop in the x-ray room that is for anesthesia and exhaust.

Top: October, 05 2010 It may not look like much in the ceiling, but there are hundreds and hundreds of feet of copper and plastic pipe which will be attached to various apparatus to keep surgery going in the most up- to- date way possible.

Top: October, 05 2010

Top: October, 05 2010

Top: October, 05 2010

Top: October, 05 2010

Top: October, 05 2010

Top: August, 27 2010

Top: August, 27 2010

Top: August, 27 2010

Top: August, 27 2010

Top: August, 10 2010 Ceiling grid installation

Top: August, 10 2010 Ceiling grid installation

Top: August, 10 2010 Ceiling grid installation

Top: August, 10 2010 Wall painting in our surgical facility

Top: August, 9 2010

Top: August, 9 2010 Drywall taping.

Top: August, 5 2010 Surgical light controls have been installed.

Top: August, 5 2010 Painting is in process...

Top: August, 5 2010 Some walls have been painted.

Top: August, 5 2010 The walls have been primered.

Top: July, 30 2010 Applying primer.

Top: July, 28 2010 Taping the drywall.

Top: July, 22 2010 Installing security cameras.

Top: July, 22 2010 Drywall has been installed.

Top: July, 22 2010 Installing sheetrock.

Top: June, 16 2010 Electrical wiring.

Top: June, 16 2010 Electrical wiring.

Top: June, 11 2010 Electrical wiring.

Top: June, 11 2010 Electrical wiring.

Top: June, 11 2010

Top: June, 11 2010 Electrical wiring.

Top: June, 11 2010 Electrical wiring.

Top: June, 11 2010 Electrical wiring.

Top: May, 3 2010 Building walls.

Top: April, 30 2010 Metal framing.

Top: April, 29 2010 Surgical facility construction goes on!

Top: April, 29 2010 Surgical facility construction goes on!

Top: October, 28 2009 First post-op patients.

Top: October, 5 2009 Pack Room. Used to sterelize surgical instruments

Top: October, 5 2009 Post-op.

Top: June, 17 2009 New surgical lights.

Top: June, 17 2009 New surgical lights.

Top: February, 6 2009 Kennel surgical area construction.

Top: Installation of beams for supporting surgical lights.

Top: Surgical unit construction began.

Top: May, 2 2004 This is how our surgical unit looked like before we started rebuilding it.


